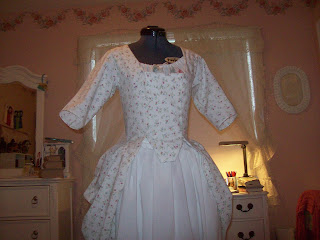
Posts

Showing posts from June, 2015

Creamy Francaise

Image
Here is another example of how I start one project before finishing another... but when I went to a thrift store and found some awesome fabric, I just had to jump headfirst into a new project. The store was having a sale on oblong table clothes, so I bought two matching ones for $3. I also found 5+ yards of raw silk for $6, so with just $9, I had enough fabric to make a francaise. I used the silk for the petticoat, and the table clothes for the francaise. I sewed it entirely by hand. This would be the first time I've worked with silk ... can you tell I enjoyed it? To make the petticoat, I cut four panels that where roughly 38"X46", and sewed them together. Two opposite panels make the front, and the other two make the sides. I pleated the front and back panels and sewed bias tape on the top to close them. For the sides, I made a casing and and used ribbon to gather the fullness around the hips. The petticoat was so big, it could be used as a

~Mitts~

Image
Yeah! My first tutorial featuring... Mitts! First you need a pattern which you can get here: 18th Century Mitt Pattern 1. Print and cut out the pattern. You may need to enlarge it, but don't  worry if it isn't perfect - it's just a guide line. 2. Cut out the fabric using the pattern, but make sure you leave about a 1/4 inch around the edges. 3. Put the mitt on your hand BACKWARDS. (With the pointy end on the bottom.) 4. Pin down the edge to fit your arm. 5. Stitch down the edge following your pinning line. try it on to make sure it fits! 6. Cut away the extra fabric on the edge. 7. Hem the top edge of the thumb, sew down the side seam. Try it on to make sure it fits! 8. With the mitt inside out and the thumb right side out, put the thumb inside the mitt through the thumb hole. 9. Pin it around the edge. 10. Stitch around the thumb. 11. Put on the mitt, and cut away the exce

Pink Flowered Polonaise

Image
I have this really bad habit of beginning a project before I finish the one that I've already started... then when I get frustrated with one project, I can put in on hold and work on an other. I was tired of working on my a l' anglaise, and was inspired by a possible trip to Colonial Williamsburg this fall (!!!!!), plus I had this adorable bed sheet just sitting in the craft room waiting to be turned into a dress... enter the Flowered Polonaise! I started with the back lining... then the front lining...  I pinned the back and front lining onto my dress form...  and pinned them together... then I put on the fabric front and back... then added a sleeve and pleated the skirt (which is not attached yet). The right shoulder The skirt is attached and both sleeves are done. Next came the fun part: Poof-ing the skirt! I added a bum roll for extra puffy-ness! And the front! Now I just need to add the trim, a

Stays in a Day!

Image
Stays in a Day! (Or two afternoons, actually.) I've really needed a pair of stays that fit. I've been wearing my second attempt, but they were two big! Attempt three I didn't finish, because I could tell before I was halfway done that it would be to big. On take four, I finally got a pair that fit me (Sigh of relief). I used white cotton twill, and cable ties to bone it. I also used less boning then the last time because I didn't really need that much, and I was running out. :)  Here are the pictures: On day one, I cut out the fabric pieces and sewed them together. On day two, I boned it, added the grommets, and bound it. I love my new stays!